
Connecting LiveKit Voice AI Agents over a Whatsapp Call
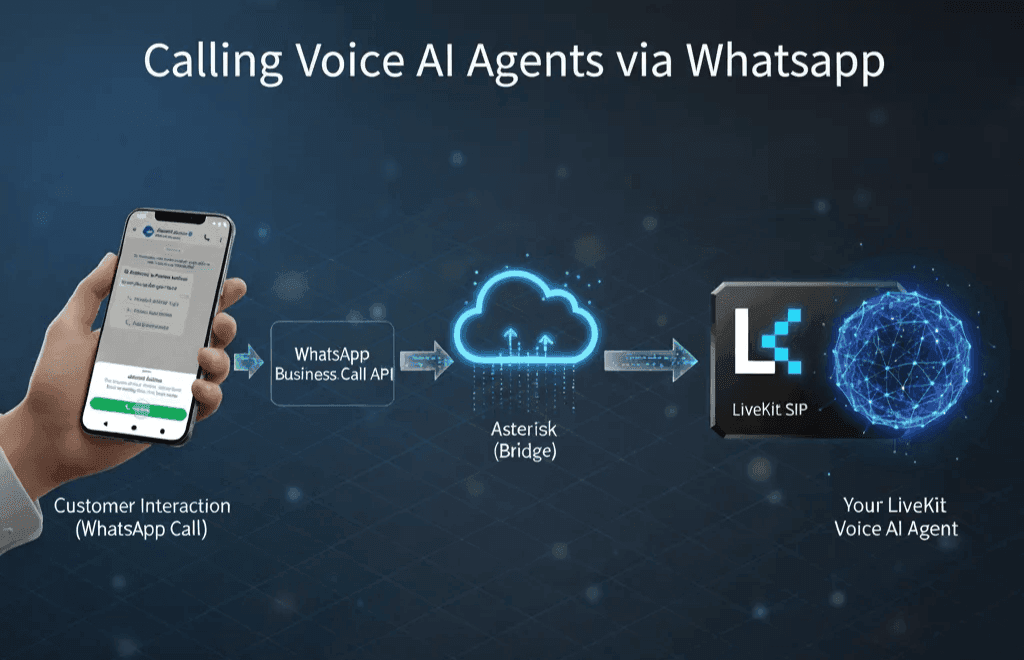
This guide walks you through connecting WhatsApp Business voice calls to LiveKit's powerful real-time communication infrastructure, enabling you to deploy AI voice agents that can handle WhatsApp calls. Whether you're building a customer service bot, an appointment booking system, or an interactive voice assistant, this integration opens up possibilities that were previously complex or impossible to achieve.
In this guide, we will create a bridge that allows:
- WhatsApp users to call your business number
- Those calls to be routed to your LiveKit-powered AI agents
- Your AI agents to handle conversations in real-time
- Full support for modern codecs and secure communication
The architecture flow is straightforward:
Customer calls your business via Whatsapp call → WhatsApp Business Call API → Asterisk (Bridge) → LiveKit SIP → Your Livekit Voice AI Agent Answers
Prerequisites: What You'll Need
Before diving in, ensure you have the following ready:
1. AWS Account
- You'll need an AWS account to host the Asterisk server
- Free tier eligible for testing, but production will require a paid instance
- Estimated cost: $20-50/month for a t2.medium instance
2. WhatsApp Business Account with API Access
- Apply through Meta Business Manager
- Requires business verification (can take 2-48 hours)
- You'll need a dedicated phone number for WhatsApp Business
- API access tier determines your messaging limits
3. Domain Name (Recommended)
- While you can use an IP address, a domain provides better security with proper SSL certificates
- Can use any domain registrar (Namecheap, GoDaddy, Route53, etc.)
- Cost: $10-15/year
Step 1: Launching Your AWS EC2 Instance
Understanding the Infrastructure
We're using AWS EC2 because it provides reliable, scalable compute resources with excellent network connectivity—crucial for real-time voice communication. The instance will run Asterisk, an open-source PBX (Private Branch Exchange) that acts as our protocol translator between WhatsApp's SIP implementation and LiveKit's.
1.1 Creating the EC2 Instance
- Log into AWS Console and navigate to EC2
- Click "Launch Instance" and configure:
- Name: Give it a descriptive name like "WhatsApp-LiveKit-Bridge"
- OS Image: Select Ubuntu Server 22.04 LTS (Long Term Support for stability)
- Instance Type: Choose t2.medium minimum
- Why t2.medium? Voice processing requires consistent CPU and memory. t2.micro might work for testing but will struggle with production loads
- Key Pair: Create new or use existing for SSH access
- Network Settings: This is crucial for voice traffic
1.2 Configuring Security Groups
Security groups act as your virtual firewall. Configure these rules carefully:
# Inbound Rules:
SSH (22): Your IP only              # For server management
Custom TCP (5061): 0.0.0.0/0        # SIP over TLS (secure signaling)
Custom UDP (10000-20000): 0.0.0.0/0 # RTP media streams (actual voice data)
Why these ports?
- Port 22: Standard SSH for server administration
- Port 5061: SIP-TLS for encrypted call signaling (instead of 5060 for unencrypted SIP)
- Ports 10000-20000: RTP (Real-time Transport Protocol) carries the actual audio. We need a range because each call uses random ports from this pool
1.3 Elastic IP Assignment
After launch, assign an Elastic IP to ensure your server's public IP doesn't change on reboot:
# In AWS Console:
1. Go to Elastic IPs
2. Allocate new address
3. Associate with your instance
Note down both IPs:
Public IP: [Your Elastic IP, e.g., 65.2.177.90]
Private IP: [Your VPC IP, e.g., 172.31.37.216]
The private IP is important for NAT traversal configuration later.
Step 2: Installing and Configuring Asterisk
Understanding Asterisk's Role
Asterisk is like a universal translator for voice protocols. WhatsApp speaks one dialect of SIP, LiveKit speaks another, and Asterisk bridges them seamlessly. It's been the gold standard for telephony systems since 1999 and handles millions of calls daily worldwide.
2.1 Initial Server Setup
Connect to your EC2 instance:
ssh ubuntu@[YOUR_ELASTIC_IP]

# First, always update the system
sudo apt update && sudo apt upgrade -y
This ensures you have the latest security patches and package versions.
2.2 Installing Asterisk
# Install Asterisk and its dependencies
sudo apt install asterisk -y

# Enable it to start on boot
sudo systemctl enable asterisk

# Start the service
sudo systemctl start asterisk
Ubuntu's package manager handles all dependencies, including:
- PJSIP: Modern SIP stack that replaced the older chan_sip
- Various codec libraries for audio encoding/decoding
- Configuration tools and utilities
2.3 Verifying Installation
# Connect to Asterisk console
sudo asterisk -rvvv

# The -rvvv flags mean:
# -r: Connect to running instance (remote console)
# -vvv: Verbose level 3 (shows detailed logs)

# Inside the console, check version
core show version

# You should see something like:
# Asterisk 18.x.x built by buildd @ lcy02-amd64-008

# Exit the console
exit
Step 3: Generating TLS Certificates for Secure Communication
Why TLS Matters
WhatsApp requires encrypted SIP connections (SIPS) for security. TLS (Transport Layer Security) ensures:
- Call signaling can't be intercepted
- Authentication credentials remain secure
- Compliance with privacy regulations
3.1 Self-Signed Certificate (Quick Setup for Testing)
For IP-based setups or initial testing:
# Create directory for certificates
sudo mkdir -p /etc/asterisk/keys
cd /etc/asterisk/keys

# Generate self-signed certificate
sudo openssl req -x509 -nodes -days 365 -newkey rsa:2048 \
  -keyout asterisk.key \
  -out asterisk.pem \
  -subj "/C=US/ST=CA/L=SF/O=YourCompany/CN=[YOUR_EC2_PUBLIC_IP]"

# Explanation of certificate parameters:
# -x509: Create self-signed certificate
# -nodes: No password protection (required for Asterisk)
# -days 365: Valid for one year
# -newkey rsa:2048: Generate new 2048-bit RSA key
# CN=[IP]: Common Name must match your connection endpoint

# Set proper permissions (critical for security)
sudo chown asterisk:asterisk /etc/asterisk/keys/*
sudo chmod 600 /etc/asterisk/keys/asterisk.key  # Only asterisk user can read
sudo chmod 644 /etc/asterisk/keys/asterisk.pem  # Public cert, readable by all
3.2 Let's Encrypt Certificate (Production Recommended)
For production with a domain name:
# Point your domain to EC2 IP first in your DNS settings
# A record: asterisk.yourdomain.com → [YOUR_ELASTIC_IP]

# Install Certbot
sudo apt install certbot -y

# Stop any services on port 80 temporarily
sudo systemctl stop apache2 nginx  # If installed

# Generate certificate
sudo certbot certonly --standalone -d asterisk.yourdomain.com

# Certbot will:
# 1. Start temporary web server
# 2. Verify domain ownership
# 3. Generate trusted certificate

# Copy certificates to Asterisk directory
sudo cp /etc/letsencrypt/live/asterisk.yourdomain.com/fullchain.pem /etc/asterisk/keys/asterisk.pem
sudo cp /etc/letsencrypt/live/asterisk.yourdomain.com/privkey.pem /etc/asterisk/keys/asterisk.key

# Set permissions
sudo chown asterisk:asterisk /etc/asterisk/keys/*
sudo chmod 600 /etc/asterisk/keys/asterisk.key
Pro tip: Let's Encrypt certificates expire every 90 days. Set up auto-renewal (covered in maintenance section).
Step 4: Configuring PJSIP - The Heart of SIP Communication
Understanding PJSIP Configuration
PJSIP is Asterisk's modern SIP stack. Think of it as the protocol handler that manages all SIP communications. We're configuring it to handle two different endpoints: WhatsApp and LiveKit, each with their specific requirements.
4.1 Create PJSIP Configuration File
sudo nano /etc/asterisk/pjsip.conf
4.2 Global Settings Explained
[global]
type=global
endpoint_identifier_order=ip,username  ; Try IP matching first, then username
max_forwards=70                        ; Prevent infinite SIP loops
keep_alive_interval=90                  ; Send keepalives every 90 seconds
contact_expiration_check_interval=30   ; How often to check registration expiry
disable_multi_domain=yes               ; Simplify domain handling
timer_b=120000                         ; Transaction timeout (120 seconds)
timer_t1=2000                          ; RTT estimate (2 seconds)
These timers are crucial for reliable connections over the internet where latency can vary.
4.3 Transport Layer Configuration
[transport-tls]
type=transport
protocol=tls
bind=0.0.0.0:5061                      ; Listen on all interfaces, port 5061
cert_file=/etc/asterisk/keys/asterisk.pem
priv_key_file=/etc/asterisk/keys/asterisk.key
method=tlsv1_2                         ; Use TLS 1.2 (secure, widely supported)
cipher=DEFAULT                         ; Use OpenSSL default cipher suite
verify_server=no                       ; Don't verify peer certificates
verify_client=no                       ; Don't require client certificates
require_client_cert=no
external_media_address=[YOUR_EC2_PUBLIC_IP]    ; NAT: Our public IP for RTP
external_signaling_address=[YOUR_EC2_PUBLIC_IP] ; NAT: Our public IP for SIP
local_net=172.31.0.0/16                        ; AWS VPC network range
allow_reload=yes                               ; Allow config reloads
NAT Traversal Explained:
- EC2 instances are behind NAT
- Asterisk needs to know both its private IP (for binding) and public IP (for SIP headers)
- Without this, audio might work one-way or not at all
4.4 WhatsApp Endpoint Configuration
; Authentication for WhatsApp
[whatsapp-auth]
type=auth
auth_type=userpass
username=[YOUR_WHATSAPP_NUMBER]  ; Format: 919876543210 or 14155551234
password=[YOUR_GENERATED_PASSWORD] ; Strong password you'll set in WhatsApp API

; Address of Record (AOR) - How to reach WhatsApp
[whatsapp-aor]
type=aor
max_contacts=1          ; Only one registration allowed
remove_existing=yes     ; Replace old registration if reconnecting
qualify_frequency=0     ; Don't send OPTIONS pings to WhatsApp

; Main endpoint configuration
[whatsapp-endpoint]
type=endpoint
context=whatsapp-calls  ; Dialplan context for incoming calls
disallow=all           ; Clear all codecs first
allow=opus,ulaw,alaw   ; Then allow these codecs (Opus preferred)
transport=transport-tls
auth=whatsapp-auth
aors=whatsapp-aor
direct_media=no        ; Always proxy media through Asterisk
ice_support=yes        ; Enable ICE for NAT traversal
use_avpf=yes          ; Audio/Video Profile with Feedback
media_encryption=dtls  ; DTLS-SRTP for encrypted media
dtls_verify=no
dtls_cert_file=/etc/asterisk/keys/asterisk.pem
dtls_private_key=/etc/asterisk/keys/asterisk.key
dtls_setup=actpass     ; Can be DTLS client or server
dtls_fingerprint=sha-256
rtcp_mux=yes          ; Multiplex RTP and RTCP on same port
trust_id_inbound=yes   ; Trust caller ID from WhatsApp
trust_id_outbound=yes  ; Send caller ID to WhatsApp
rtp_symmetric=yes      ; Send RTP back to source address
force_rport=yes        ; Force rport in Via header
rewrite_contact=no     ; Don't rewrite Contact header
timers=no              ; Disable session timers
100rel=no              ; Don't require PRACK
from_domain=[YOUR_EC2_PUBLIC_IP]

; IP-based authentication for WhatsApp
[whatsapp-identify]
type=identify
endpoint=whatsapp-endpoint
match=69.171.251.0/24,157.240.0.0/16,31.13.64.0/18,66.220.144.0/20,69.63.176.0/20,173.252.64.0/18,185.60.216.0/22
Why these IP ranges? These are Facebook/Meta's IP blocks. WhatsApp calls will come from these addresses.
4.5 LiveKit Endpoint Configuration
; LiveKit AOR
[livekit-aor]
type=aor
contact=sip:[YOUR_LIVEKIT_SIP_URI]:5061;transport=TLS
max_contacts=1
qualify_frequency=0

; LiveKit endpoint (simpler than WhatsApp)
[livekit-endpoint]
type=endpoint
context=from-livekit
disallow=all
allow=ulaw,alaw,opus
transport=transport-tls
aors=livekit-aor
direct_media=no
ice_support=no         ; LiveKit handles its own NAT traversal
use_avpf=no           ; Standard RTP profile
media_encryption=no    ; LiveKit handles encryption at application layer
rtcp_mux=no
trust_id_inbound=yes
trust_id_outbound=yes
rtp_symmetric=yes
force_rport=yes
rewrite_contact=yes
asymmetric_rtp_codec=yes ; Allow different codecs each direction
send_rpid=yes         ; Send Remote-Party-ID header
send_pai=yes          ; Send P-Asserted-Identity header
timers=no
100rel=no

; Identify LiveKit by IP
[livekit-identify]
type=identify
endpoint=livekit-endpoint
match=[LIVEKIT_IP]/32  ; Get via: nslookup [YOUR_LIVEKIT_SIP_URI]
Step 5: Creating the Dialplan - Call Routing Logic
Understanding Dialplans
The dialplan is Asterisk's routing table. It defines what happens when calls arrive and where they should go. Think of it as a sophisticated switchboard operator that follows your rules.
5.1 Create Extensions Configuration
sudo nano /etc/asterisk/extensions.conf
5.2 Dialplan Configuration Explained
[general]
static=yes          ; Load dialplan from config file
writeprotect=no     ; Allow CLI modifications (useful for debugging)
clearglobalvars=no  ; Keep global variables between reloads

[globals]
; Define any global variables here
; Example: COMPANY_NAME=YourCompany

[whatsapp-calls]
; Context for incoming WhatsApp calls
; Pattern matching: _+X. means "+" followed by one or more digits
exten => _+X.,1,NoOp(=== WHATSAPP CALL RECEIVED ===)
 same => n,NoOp(From: ${CALLERID(num)})
 same => n,NoOp(Raw Extension: ${EXTEN})
 ; WhatsApp might append parameters with semicolon, clean them
 same => n,Set(CLEAN_EXTEN=${CUT(EXTEN,\;,1)})
 same => n,NoOp(Cleaned Extension: ${CLEAN_EXTEN})
 same => n,Answer()  ; Answer the call
 same => n,Playback(hello-world)  ; Play greeting (optional)
 same => n,Wait(1)   ; Brief pause
 ; Forward to LiveKit with 30-second timeout
 same => n,Dial(PJSIP/${CLEAN_EXTEN}@livekit-endpoint,30)
 same => n,Hangup()

; Fallback for calls without "+" prefix
exten => _X.,1,NoOp(=== WHATSAPP FALLBACK ===)
 same => n,Set(CLEAN_EXTEN=${CUT(EXTEN,\;,1)})
 same => n,Answer()
 same => n,Playback(hello-world)
 same => n,Hangup()

[from-livekit]
; Handle outbound calls from LiveKit to WhatsApp
exten => _+X.,1,NoOp(=== CALL FROM LIVEKIT ===)
 same => n,Answer()
 same => n,Dial(PJSIP/${EXTEN}@whatsapp-endpoint,30)
 same => n,Hangup()
Dialplan Syntax Explained:
exten =>: Defines an extension (phone number pattern)_+X.: Pattern where _ starts pattern, + is literal plus, X is any digit, . is one or more1: Priority 1 (first step)n: Next priority (auto-increment)same: Continue same extensionNoOp(): No Operation - just logs message${VARIABLE}: Variable substitutionDial(): Initiate outbound call
Step 6: Configuring RTP for Media Streams
Understanding RTP
RTP (Real-time Transport Protocol) carries the actual voice data. While SIP sets up the call, RTP transmits the audio. Getting this right is crucial for voice quality.
6.1 Edit RTP Configuration
sudo nano /etc/asterisk/rtp.conf
6.2 RTP Settings Explained
[general]
rtpstart=10000        ; First RTP port in range
rtpend=20000          ; Last RTP port in range
                      ; 10,000 ports = 5,000 simultaneous calls
rtcpinterval=5000     ; RTCP reports every 5 seconds
strictrtp=no          ; Don't enforce strict RTP (needed for NAT)
icesupport=yes        ; Enable ICE for NAT traversal
stunaddr=stun.l.google.com:19302  ; Google's public STUN server
Why these settings?
- Port range: Each call uses 2 ports (RTP + RTCP), sometimes 4 with video
- RTCP: Provides quality metrics and sync information
- Strict RTP: Disabled because WhatsApp might change media source
- ICE/STUN: Helps establish connections through NAT/firewalls
Step 7: Configuring WhatsApp Business API
Understanding WhatsApp's SIP Integration
WhatsApp Business API recently added SIP support, allowing calls to be routed to your own infrastructure instead of being handled in the WhatsApp app. This is powerful but requires proper configuration.
7.1 Gathering Your WhatsApp Credentials
In Meta Business Manager:
- Navigate to WhatsApp Business Platform
- Select your Phone Number
- Go to Phone Numbers → Settings
- Find your Phone Number ID (e.g.,
729696566887272) - Generate an Access Token (keep this secure!)
7.2 Generate Secure SIP Password
# Generate cryptographically secure password
openssl rand -base64 32
# Example output: qxr1SQwSUeT0a5GfZ2n4uEuK4F3IDRGj

# Save this password - you'll need it for both WhatsApp API and Asterisk config
7.3 Configure WhatsApp SIP Settings via API
# Replace placeholders with your actual values
curl -X POST "https://graph.facebook.com/v22.0/[PHONE_NUMBER_ID]" \
-H "Authorization: Bearer [YOUR_ACCESS_TOKEN]" \
-H "Content-Type: application/json" \
-d '{
  "calling": {
    "sip": {
      "uri": "sips:[YOUR_DOMAIN_OR_IP]:5061",
      "username": "[YOUR_WHATSAPP_NUMBER]",
      "password": "[YOUR_GENERATED_PASSWORD]"
    }
  }
}'

# Expected response:
# {"success": true}
Important notes:
- Use
sips:(notsip:) for TLS - Port 5061 is standard for SIP-TLS
- Username is your WhatsApp number without "+" (e.g., 919876543210)
- Password must match what you configured in Asterisk
7.4 Verify Configuration
# Check current configuration
curl -X GET "https://graph.facebook.com/v22.0/[PHONE_NUMBER_ID]?fields=calling" \
-H "Authorization: Bearer [YOUR_ACCESS_TOKEN]"
Step 8: Configuring LiveKit for SIP Integration
Understanding LiveKit's Architecture
LiveKit is a powerful WebRTC platform that can handle real-time communication at scale. Its SIP bridge allows traditional telephony to connect with modern WebRTC applications.
8.1 LiveKit SIP Trunk Setup
- Log into LiveKit Cloud Console at cloud.livekit.io
- Navigate to Settings → SIP
- Create Inbound Trunk:
- Name:
whatsapp_trunk(descriptive name) - Numbers:
+[YOUR_WHATSAPP_NUMBER](must match WhatsApp) - Authentication: Leave disabled (we authenticate at Asterisk level)
- Note the SIP URI: Will be like
abc123.sip.livekit.cloud
- Name:
8.2 Create Dispatch Rules
Dispatch rules determine how incoming calls are handled:
-
Go to SIP → Dispatch Rules
-
Create New Rule:
Name: whatsapp_dispatch Trunk: whatsapp_trunk Rule Type: Agent-based dispatch Room Prefix: call- Agent Request: { "agent": "[YOUR_AGENT_NAME]", "metadata": { "source": "whatsapp" } } -
Advanced Options:
- Pin Timeout: 30 seconds (how long to wait for agent)
- Max Call Duration: 3600 seconds (1 hour)
- Recording: Enable if needed for quality/compliance
8.3 Configure Your LiveKit Agent
Your LiveKit agent needs to be configured to handle SIP participants:
# Example agent configuration (Python)
import asyncio
from livekit.agents import Agent, JobContext

class WhatsAppVoiceAgent(Agent):
    async def on_participant_connected(self, participant):
        # Check if this is a SIP participant
        if participant.kind == "SIP":
            # Extract caller information
            caller_number = participant.identity

            # Start your conversation logic
            await self.start_conversation(participant)

    async def start_conversation(self, participant):
        # Your AI logic here
        pass
Step 9: Testing and Monitoring
9.1 Restart Asterisk with New Configuration
# Restart to load all configurations
sudo systemctl restart asterisk

# Check status
sudo systemctl status asterisk
9.2 Real-time Monitoring Setup
Open multiple terminal windows for comprehensive monitoring:
Terminal 1 - Asterisk Console:
sudo asterisk -rvvv
pjsip set logger on        # Enable PJSIP logging
core set verbose 10        # Maximum verbosity
core set debug 10          # Maximum debug info
Terminal 2 - Network Traffic:
# Monitor SIP traffic
sudo tcpdump -i any port 5061 -n -s 0 -A

# Or use ngrep for better readability
sudo apt install ngrep -y
sudo ngrep -W byline -d any port 5061
Terminal 3 - System Resources:
# Monitor CPU and memory
htop

# Or use simple watch command
watch -n 1 'free -h; echo; ps aux | grep asterisk'
9.3 Making Your First Test Call
- From any phone, call your WhatsApp Business number
- Watch the Asterisk console for the flow:
Expected output:
=== WHATSAPP CALL RECEIVED ===
From: +1234567890
Raw Extension: +919876543210
Cleaned Extension: +919876543210
-- Executing Answer()
-- Executing Playback(hello-world)
-- Executing Dial(PJSIP/+919876543210@livekit-endpoint,30)
-- Called PJSIP/+919876543210@livekit-endpoint
-- PJSIP/livekit-endpoint-00000001 answered
- Verify in LiveKit Dashboard:
- Check active rooms
- Verify agent connected
- Monitor call quality metrics
9.4 Common Call Flow Issues and Solutions
| Issue | Symptoms | Solution |
|---|---|---|
| TLS Handshake Failure | "SSL_ERROR" in logs | Verify certificate CN matches connection address |
| One-way Audio | Can hear but not speak | Check NAT settings, ensure external_media_address is set |
| Call Drops at 30s | Exactly 30 seconds | Disable session timers, check firewall for RTP ports |
| 488 Not Acceptable | Immediate rejection | Codec mismatch - ensure opus,ulaw,alaw enabled |
| 503 Service Unavailable | LiveKit rejects call | Agent not online or dispatch rule mismatch |
Step 10: Advanced Troubleshooting
10.1 Testing TLS Connectivity
# Test TLS handshake
openssl s_client -connect [YOUR_IP]:5061 -showcerts

# You should see:
# - Certificate chain
# - "Verify return code: 18 (self signed certificate)" is OK for self-signed
# - "Verify return code: 0 (ok)" for Let's Encrypt

# Test from another server to ensure firewall rules work
nc -zv [YOUR_IP] 5061
10.2 Debugging Audio Issues
# In Asterisk console
rtp set debug on
rtcp set debug on

# This shows:
# - RTP packet flow
# - Packet loss statistics
# - Jitter measurements
# - RTCP quality reports
10.3 SIP Message Analysis
# Capture full SIP dialog to file
sudo tcpdump -i any -w /tmp/sip_capture.pcap port 5061

# Analyze with tshark
tshark -r /tmp/sip_capture.pcap -Y sip

# Or use sngrep for interactive analysis
sudo apt install sngrep -y
sudo sngrep -r /tmp/sip_capture.pcap
10.4 LiveKit Connection Issues
# Get LiveKit SIP server IP
nslookup [YOUR_LIVEKIT_SIP_URI]

# Test connectivity
nc -zv [LIVEKIT_IP] 5061

# If IP changed, update pjsip.conf [livekit-identify] section
Production Deployment Considerations
High Availability Setup
For production, consider:
-
Multiple Asterisk Servers:
WhatsApp → Load Balancer → Asterisk Cluster → LiveKit -
Database Backend:
# Use PostgreSQL for configuration sudo apt install postgresql-14 odbc-postgresql # Configure Asterisk Realtime for dynamic configuration -
Monitoring Stack:
# Prometheus + Grafana for metrics
# ELK stack for log aggregation
# Custom health checks for automated recovery
Security Hardening
-
Fail2Ban for Brute Force Protection:
sudo apt install fail2ban -y

# Create Asterisk jail
sudo nano /etc/fail2ban/jail.local
[asterisk] enabled = true filter = asterisk port = 5061 protocol = tcp maxretry = 3 bantime = 3600 -
Rate Limiting:
# In pjsip.conf [global] max_initial_qualify_time=4 max_contacts_per_aor=1 -
Regular Updates:
# Create update script
sudo nano /usr/local/bin/security_updates.sh

#!/bin/bash
apt update
apt upgrade -y
systemctl restart asterisk
Performance Optimization
-
Kernel Tuning for high call volumes:
# /etc/sysctl.conf net.core.rmem_max = 33554432 net.core.wmem_max = 33554432 net.ipv4.tcp_rmem = 4096 87380 33554432 net.ipv4.tcp_wmem = 4096 65536 33554432 net.ipv4.tcp_congestion_control = bbr -
Asterisk Threading:
# /etc/asterisk/asterisk.conf [options] maxcalls = 1000 maxload = 0.9 cache_media_frames = yes -
Codec Optimization:
- Prefer Opus for best quality/bandwidth ratio
- G.711 (ulaw/alaw) for compatibility
- Avoid transcoding when possible
Maintenance and Monitoring
Automated Certificate Renewal
# Setup Let's Encrypt auto-renewal
sudo crontab -e

# Add this line
0 2 * * * certbot renew --quiet --post-hook "/usr/local/bin/update_asterisk_cert.sh"

# Create the update script
sudo nano /usr/local/bin/update_asterisk_cert.sh
#!/bin/bash
DOMAIN="asterisk.yourdomain.com"
cp /etc/letsencrypt/live/$DOMAIN/fullchain.pem /etc/asterisk/keys/asterisk.pem
cp /etc/letsencrypt/live/$DOMAIN/privkey.pem /etc/asterisk/keys/asterisk.key
chown asterisk:asterisk /etc/asterisk/keys/*
chmod 600 /etc/asterisk/keys/asterisk.key
systemctl reload asterisk
echo "Certificates updated at $(date)" >> /var/log/cert_renewal.log
Health Monitoring Script
sudo nano /usr/local/bin/asterisk_health_check.sh
#!/bin/bash

# Check if Asterisk is running
if ! systemctl is-active --quiet asterisk; then
    echo "Asterisk down at $(date), attempting restart" >> /var/log/asterisk_health.log
    systemctl restart asterisk

    # Send alert (configure your alerting method)
    # curl -X POST https://your-webhook.com/alert -d "Asterisk restarted"
fi

# Check SIP trunk registration
asterisk -rx "pjsip show registrations" | grep -q "Registered"
if [ $? -ne 0 ]; then
    echo "SIP registration failed at $(date)" >> /var/log/asterisk_health.log
    # Send alert
fi

# Check for zombie calls (calls lasting >2 hours)
asterisk -rx "core show channels" | awk '$5 > 7200 {print $1}' | while read channel; do
    echo "Hanging up zombie call: $channel" >> /var/log/asterisk_health.log
    asterisk -rx "channel request hangup $channel"
done
# Add to crontab
*/5 * * * * /usr/local/bin/asterisk_health_check.sh
Log Rotation
# Create logrotate configuration
sudo nano /etc/logrotate.d/asterisk
/var/log/asterisk/*.log {
    daily
    rotate 30
    compress
    missingok
    notifempty
    sharedscripts
    postrotate
        /usr/sbin/asterisk -rx 'logger reload' > /dev/null 2>&1
    endscript
}
Cost Optimization Tips
1. EC2 Reserved Instances
- Save up to 72% with 1-year commitment
- Use Spot instances for development/testing
2. Bandwidth Optimization
- Opus codec uses ~20-40 kbps vs G.711 at 64 kbps
- Enable silence suppression
- Use RTP packet batching
3. Auto-scaling for Peak Hours
# CloudWatch alarm for CPU > 70%
# Auto Scaling Group with min=1, max=5
# Target tracking scaling policy
Verification Checklist
Before going live, ensure:
- Infrastructure
- EC2 instance running with Elastic IP
- Security groups properly configured
- Domain pointing to server (if using)
- Asterisk Configuration
- TLS certificates generated and valid
- PJSIP endpoints configured
- Dialplan tested
- RTP ports open and configured
- WhatsApp Integration
- Business API configured with SIP settings
- Authentication working
- Test call successful
- LiveKit Integration
- SIP trunk created
- Dispatch rules configured
- Agent receiving calls
- Audio working bidirectionally
- Monitoring & Maintenance
- Health checks in place
- Log rotation configured
- Certificate renewal automated
- Backup strategy implemented
Conclusion
Congratulations! You've successfully built a bridge between WhatsApp Business calling and LiveKit's powerful real-time communication platform. This integration opens up numerous possibilities:
- Customer Service: AI agents handling support calls 24/7
- Healthcare: Appointment booking and patient triage
- E-commerce: Order status and product inquiries
- Education: Interactive learning assistants
- Finance: Secure banking inquiries and transactions
The architecture you've built is:
- Scalable: Can handle hundreds of concurrent calls
- Secure: End-to-end encryption with TLS and SRTP
- Flexible: Easy to modify for different use cases
- Reliable: Built on battle-tested open-source technology
Next Steps
- Enhance Your AI Agent: Integrate advanced NLP and speech recognition
- Add Analytics: Track call metrics, sentiment analysis, conversion rates
- Implement Fallbacks: Human handoff when AI can't handle requests
- Scale Globally: Deploy in multiple regions for lower latency
- Add More Channels: Extend to regular phone lines, other messaging platforms
Resources and Community
- Asterisk Documentation: https://wiki.asterisk.org
- LiveKit Documentation: https://docs.livekit.io
- WhatsApp Business API: https://developers.facebook.com/docs/whatsapp
- Community Forums: Join discussions and get help from experts
Remember, this is just the beginning. The real power comes from what you build on top of this foundation. Whether you're revolutionizing customer service, healthcare, or creating entirely new types of voice interactions, you now have the tools to make it happen.
Happy building, and may your voice agents always answer on the first ring! 🚀